



Modern research laboratories require efficient solutions for complex experimental workflows. Cell staining procedures traditionally involve multiple sample transfers between culture vessels and microscope slides, creating contamination risks and reducing reproducibility. Cell culture chambers address these challenges by integrating cell growth and imaging preparation on a single platform.
These specialized laboratory tools feature removable chamber systems mounted on high-quality imaging substrates. You can seed, incubate, fix, and stain cells without transferring samples between different containers. The removable design maintains sterile culture conditions during incubation, then converts to a standard microscope slide format after chamber removal.
This integrated approach streamlines cell staining protocols across multiple research disciplines. Cell culture chambers eliminate workflow bottlenecks while improving data quality for immunofluorescence microscopy applications. We designed these systems to meet the demands of cell biology, immunology, and pathology research professionals seeking reproducible results.
Available configurations include multiple well formats with various substrate materials and surface treatments. Each option addresses specific experimental requirements for different cell types and imaging modalities.
Key Takeaways
- Chamber slides combine cell culture and microscopy functions on a single platform to reduce sample handling steps
- Removable chamber design maintains sterile conditions during incubation and creates standard slide format for imaging
- Integrated workflow eliminates sample transfer between vessels, reducing contamination risks by up to 60%
- Multiple well formats and substrate options accommodate diverse experimental protocols and cell types
- Compatible with conventional and advanced imaging systems including confocal and fluorescence microscopy
- Optimized surface treatments enhance cell attachment and support long-term culture applications
Understanding 8-Well Chambered Slides
We understand that selecting the right microscopy slides with wells begins with comprehensive knowledge of their fundamental structure and design. These specialized laboratory imaging platforms serve researchers who need reliable equipment for cellular studies. Your experimental success depends on choosing tools that match your specific imaging requirements.
The technology behind these systems combines precision engineering with biological compatibility. Each component works together to create optimal conditions for both cell growth and microscopic observation. You gain efficiency when your equipment eliminates unnecessary sample transfers.
Design and Functionality of Specialized Imaging Systems
Glass bottom chamber slides consist of two essential components that work together seamlessly. The base is a standard microscope slide that provides optical clarity for high-resolution imaging. The removable chamber structure creates individual wells that sit securely on top of this slide.
We design these systems so that chamber walls form discrete compartments measuring precisely to prevent any cross-contamination. Each well maintains its own microenvironment during the culture period. You can process multiple experimental conditions simultaneously on a single slide, which saves both time and resources.
The removable nature of the chamber system represents a significant innovation in laboratory workflow. After your cells complete their culture phase, you simply detach the chamber walls. This transformation converts your culture vessel into a standard microscopy slide ready for immediate imaging.
Key Features and Benefits
These optical substrates deliver specific advantages that enhance your research capabilities. Precise well geometry ensures uniform culture conditions across all compartments. You receive consistent results because each well provides identical volume and surface area.
The compatibility with standard microscopy equipment eliminates the need for specialized imaging systems. We ensure that these slides fit conventional microscope stages without adaptation. Your existing laboratory infrastructure works perfectly with this technology.
Surface treatments optimize cell attachment for various cell types. Each substrate receives specific chemical modifications that promote cellular adhesion. You achieve reliable results even with challenging or sensitive cell lines.
Your research workflow benefits from several practical advantages:
- Reduced sample handling minimizes cell loss and preserves natural morphology during the transition from culture to imaging
- Decreased reagent consumption through small working volumes of 200-400 μL per well reduces experimental costs significantly
- Parallel experimental conditions enable efficient dose-response studies or multi-marker comparisons on a single platform
- Seamless culture-to-imaging transition eliminates transfer steps that often damage delicate cellular structures
Common Materials Used
We manufacture laboratory imaging platforms using materials selected for specific performance characteristics. Polystyrene chambers offer excellent chemical resistance and transparency for visual monitoring during the culture phase. These chambers withstand common laboratory reagents without degradation.
Glass substrates provide superior optical properties essential for advanced microscopy techniques. The soda-lime glass receives RS treatment to enhance cell attachment capabilities. This material delivers minimal autofluorescence, which proves critical for fluorescence imaging applications.
Permanox plastic with Nunclon Delta treatment represents another material option. This specialized plastic combines the optical benefits of glass with enhanced flexibility. You gain improved chemical resistance compared to standard polystyrene.
Surface coatings further customize these platforms for specific applications. Tissue culture treatments modify surface chemistry to promote general cell adhesion. Protein adsorption layers like poly-D-lysine enhance attachment for neurons and other specialized cells. Synthetic polymer modifications create biomimetic surfaces that support stem cells and primary cultures.
Chamber materials attach to the microscope slide base using medical-grade silicone or biocompatible adhesives. We select these bonding agents for their strength during culture and their clean removal before imaging. Your slides remain free from residue that could interfere with optical clarity.
Material selection impacts your experimental outcomes based on several factors. Cell type requirements dictate the necessary surface chemistry. Imaging modality specifications determine the optical properties you need. Protocol compatibility considerations ensure that your chosen materials withstand all experimental conditions from initial seeding through final analysis.
Advantages of Using 8-Well Chambered Slides
Scientific professionals working with cell culture systems consistently identify three primary advantages that make lab imaging chambers essential tools for precise experimental work. These benefits translate directly into improved data quality and accelerated research timelines. We examine how multi-well microscope slides address fundamental challenges that researchers encounter during staining protocols and microscopy applications.
The integrated design of these specialized platforms delivers measurable improvements across experimental workflows. You gain control over variables that traditionally compromise result consistency. Each advantage builds upon the others to create a comprehensive solution for demanding research applications.
Enhanced Staining Precision
Lab imaging chambers provide superior control over the geometric factors that determine staining quality. The uniform well dimensions ensure that antibody solutions distribute evenly across your cell populations. This standardization eliminates the concentration variability that occurs with traditional coverslip methods.
You achieve cell culture precision through several measurable factors. Each well maintains identical surface area, which allows accurate quantification of staining intensity. The controlled volume specifications—such as 250 μL per well in standard configurations—guarantee consistent reagent contact with your samples.
Multi-well microscope slides enable you to conduct comparative experiments with perfect internal controls. The chamber walls prevent liquid mixing between adjacent wells during incubation periods. This isolation lets you test multiple conditions simultaneously:
- Different antibody concentrations across wells
- Variable incubation durations for protocol optimization
- Alternative blocking strategies within single experiments
- Parallel positive and negative controls
The reproducibility improves because identical culture conditions exist across all wells. Media depth, gas exchange rates, and temperature distribution remain constant during your incubation steps. Immunofluorescence protocols using these systems demonstrate successful staining of adherent cells including endothelial cells like HUVEC and complex structures such as multi-cellular tumor spheroids.
Reduced Sample Contamination
The closed chamber design during culture and staining steps provides critical contamination prevention advantages for your valuable specimens. Airborne contaminants cannot reach your samples during extended incubation periods. This protection becomes essential when working with limited or irreplaceable biological materials.
We recognize that transfer steps represent the primary contamination introduction points in traditional protocols. Each time you move cells from culture vessels to microscope slides, you create opportunities for bacterial or fungal contamination. The integrated format of lab imaging chambers eliminates these vulnerable transition moments entirely.
Cross-contamination between experimental conditions cannot occur because sealed wells maintain physical separation. The chamber structure prevents accidental spillover during media changes or washing steps. You maintain sterile conditions throughout your protocol without requiring specialized equipment beyond standard laboratory biosafety practices.
The evaporation prevention built into the closed design preserves your reagent concentrations. Volume stability ensures that antibody dilutions remain accurate from the first well to the last. This consistency proves particularly important during lengthy protocols that require multiple incubation and washing cycles.
Simplified Experimental Setup
Multi-well microscope slides streamline your research workflow by consolidating multiple procedural steps into a single platform. You seed cells directly onto the imaging substrate, which eliminates separate coverslip handling entirely. This integration removes the technical complexity associated with cell transfer procedures.
The removable chamber design means you perform all protocol stages in one vessel. Fixation, permeabilization, blocking, antibody incubations, and washing steps occur where cells were originally cultured. When you complete the staining protocol, simply remove the chamber structure to reveal a standard microscope slide ready for immediate imaging.
This consolidated approach delivers practical benefits that accelerate your research timeline:
- Reduced hands-on time through elimination of transfer steps
- Decreased technical skill requirements for consistent results
- Lower probability of procedural errors that compromise data
- Minimized sample loss during handling transitions
The cell culture precision you achieve extends beyond staining quality to encompass overall experimental efficiency. Fewer manipulation steps mean less opportunity for mechanical damage to delicate cell structures. Your spheroids, monolayers, and co-culture systems remain intact throughout the entire protocol sequence.
We observe that laboratories adopting these systems report substantial time savings in daily operations. The learning curve for new personnel decreases significantly because the intuitive design requires less specialized training. You maintain research momentum while ensuring reproducible outcomes across different operators and experimental sessions.
Applications of 8-Well Chambered Slides in Research
Chambered coverglass platforms deliver versatile solutions for diverse experimental applications in modern laboratory research. We present comprehensive application scenarios demonstrating how these systems serve as essential tools across cellular biology, molecular imaging, and diagnostic investigations. The multi-well configuration enables parallel experimental conditions while maintaining optical quality necessary for high-resolution microscopy.
Research laboratories employ tissue culture chamber slides for experiments requiring direct visualization of cellular processes. The standardized well geometry facilitates quantitative analysis across treatment groups. You achieve reproducible results because each well provides identical optical properties and surface chemistry for cell attachment.
The transparent construction allows real-time observation without sample transfer. This design eliminates handling artifacts that compromise data integrity in traditional preparation methods.
Cell Culture Studies
You utilize tissue culture chamber slides for morphological analysis of adherent cell lines including fibroblasts, epithelial cells, and endothelial cells. The defined well geometry enables standardized cell seeding densities, facilitating quantitative comparisons of proliferation rates and migration patterns. Primary cultures requiring optimized surface chemistry benefit from the controlled environment these platforms provide.
Co-culture experiments represent an advanced application where spatial organization between cell types requires careful visualization. The multi-well format allows parallel assessment of different cell ratio combinations. You can evaluate paracrine signaling configurations by observing interaction patterns between distinct cell populations within individual wells.
Differentiation studies employ chambered coverglass to track cellular transformation over extended periods. Researchers document morphological changes as stem cells commit to specific lineages. The optical quality supports phase contrast and differential interference contrast microscopy throughout the culture duration.
Immunofluorescence Applications
Immunofluorescence protocols demonstrate exceptional compatibility with chambered coverglass systems. We observe widespread adoption for protein localization studies, receptor expression quantification, and signaling pathway activation analysis. The glass substrates minimize background autofluorescence that would compromise signal detection in plastic vessels.
You perform multi-marker immunofluorescence labeling cytoplasmic proteins such as α-Tubulin for microtubules and phalloidin for F-actin cytoskeleton visualization. Membrane receptors, nuclear transcription factors, and organelle markers can be labeled simultaneously. DAPI counterstaining provides nuclear visualization for cell counting and morphological assessment.
The protocol workflow proceeds efficiently within the same wells. After cell culture, you apply fixation using 10% formalin or 4% paraformaldehyde. Permeabilization with 0.5-1% Triton X-100 allows antibody penetration. Blocking steps using 2-10% serum with BSA reduce non-specific binding.
Advanced applications include multi-cellular tumor spheroid imaging. Whole-spheroid staining protocols using pan-Cytokeratin and Vimentin antibodies enable spatial architecture analysis. These three-dimensional cultures undergo optical clearing for confocal microscopy, revealing cell-cell interactions within complex tissue structures.
| Application Type | Target Markers | Fixation Method | Imaging Modality |
|---|---|---|---|
| Cytoskeleton Analysis | α-Tubulin, Phalloidin, DAPI | 4% Paraformaldehyde | Confocal Microscopy |
| Receptor Expression | Membrane Receptors, Nuclear Markers | 10% Formalin | Widefield Fluorescence |
| Tumor Spheroid Imaging | Pan-Cytokeratin, Vimentin | Paraformaldehyde + Optical Clearing | Confocal/Light-Sheet |
| Signaling Pathway Studies | Phospho-Proteins, Transcription Factors | Methanol or PFA | High-Content Imaging |
Live Cell Imaging
Live cell microscopy applications exploit the exceptional optical quality these systems deliver. You conduct time-lapse microscopy tracking cell division, migration, or response to pharmaceutical compounds. The transparent chamber structure maintains physiological conditions while providing direct optical access to cultured cells.
Environmental control becomes straightforward when using tissue culture chamber slides. Compatibility with stage-top incubators enables extended imaging sessions spanning hours or days. Temperature regulation, CO₂ concentration, and humidity levels remain stable throughout observation periods.
Perfusion systems integrate seamlessly with chambered platforms for continuous media exchange during imaging. You can introduce test compounds while capturing real-time cellular responses. This capability proves essential for pharmacokinetic studies and drug screening applications.
Fluorescent protein expression tracking represents another valuable live cell microscopy application. Cells transfected with GFP, mCherry, or other fluorescent reporters reveal protein dynamics and cellular processes. The low autofluorescence of glass substrates enhances signal-to-noise ratios compared to plastic alternatives.
Advanced three-dimensional culture imaging extends the utility of chambered coverglass beyond monolayer applications. Tumor spheroids or organoids cultured in the wells undergo whole-mount staining followed by optical clearing. Light-sheet microscopy or confocal z-stacking enables spatial analysis of tissue architecture within complex multicellular structures.
We recommend these platforms for experiments requiring both culture maintenance and direct microscopic observation. The combination of controlled environment and superior optics eliminates common limitations associated with transferring samples between culture vessels and microscopy slides.
Selecting the Right 8-Well Chambered Slides
When you evaluate cell imaging wells, several critical factors influence your final purchasing decision. We provide systematic guidance to help you balance technical requirements with practical considerations. Your choice directly impacts experimental outcomes, reagent efficiency, and overall research success.
The selection process requires careful analysis of your specific protocol demands. You must consider well dimensions, substrate materials, and surface treatments before making a commitment. Understanding these laboratory equipment specifications enables informed decisions that optimize both performance and budget allocation.
Determining Appropriate Size and Volume
Your reagent availability and cell seeding requirements determine the ideal well capacity for your experiments. Standard 8-well formats typically provide between 200 and 400 μL capacity per well. The µ-Slide 8 Well high configuration offers 250 μL working volume, which suits most immunofluorescence protocols effectively.
The growth area per well ranges from 0.7 to 1.0 cm² in typical configurations. This parameter influences the cell number needed for confluent cultures. It also affects the imaging field of view available during data collection.
You should evaluate your experimental design before selecting a format. Multiple conditions with replicates favor 8 or 16-well configurations. Fewer conditions requiring larger culture areas suggest 2 or 4-well formats instead.
High variants with increased working volumes accommodate extended culture periods effectively. Standard height chambers suffice for protocols proceeding quickly from seeding to fixation. Consider your timeline when applying slide selection criteria to your research needs.
Ensuring Compatibility with Staining Protocols
Substrate selection demands careful attention to your specific staining requirements. Glass bottom slides provide superior optical characteristics essential for high-resolution fluorescence microscopy. They offer minimal autofluorescence background and compatibility with oil immersion objectives.
Certain cell types demonstrate enhanced adhesion to plastic substrates. Specialized surface treatments improve attachment for challenging cell lines. You must verify that surface chemistry supports your particular cell type before proceeding.
Available substrate options include several specialized configurations:
- Permanox plastic with Nunclon Delta treatment for standard adherent cell lines
- Soda-lime glass with RS treatment for superior optical clarity
- Chemically modified CC2 surfaces mimicking poly-D-lysine properties
- Standard tissue culture treatment for most common applications
Primary neurons, stem cells, and suspension-adapted lines often require specialized coatings. Options include poly-D-lysine, poly-L-lysine, collagen, fibronectin, or laminin. We recommend testing adhesion with your specific cell line before large-scale implementation.
The removable chamber mechanism varies between available systems. Medical-grade silicone seals enable removal and reattachment if optimization requires protocol adjustments. Permanent biocompatible adhesives provide secure attachment preventing leakage during vigorous washing.
Chamber materials include clear polystyrene configurations with two design variations. Versions with handles facilitate aseptic manipulations during culture maintenance. Versions without handles optimize microscopic viewing by reducing interference with optical pathways.
Balancing Materials and Cost Effectiveness
Your performance requirements must align with available budget constraints when selecting 8-Well Chambered Slides. Glass substrates command premium pricing but deliver optical quality necessary for publication-grade imaging. This investment proves essential for quantitative analysis requiring precise measurements.
Plastic alternatives offer cost savings appropriate for specific applications. Screening experiments, protocol optimization, and teaching laboratories benefit from these economical options. You sacrifice some optical performance but gain significant budget flexibility.
We recommend evaluating total cost per data point rather than unit price alone. This comprehensive analysis includes several financial considerations:
| Cost Factor | Glass Substrates | Plastic Substrates | Impact on Budget |
|---|---|---|---|
| Initial Unit Price | Premium pricing | Standard pricing | Immediate expense difference |
| Reagent Consumption | 200-250 μL per well | 200-250 μL per well | Equivalent ongoing costs |
| Protocol Success Rate | Higher for demanding applications | Adequate for standard protocols | Reduced repeat experiments |
| Image Quality Output | Publication-grade resolution | Screening-level clarity | Affects data usability |
Systems reducing protocol failures demonstrate superior cost effectiveness despite higher initial investment. Sample loss and failed experiments compound costs beyond the chamber price. Your budget planning should account for labor time invested in each experimental cycle.
The available format range includes 1, 2, 4, 8, and 16-well configurations across different manufacturers. Each format offers distinct advantages for specific experimental designs. Matching configuration to throughput needs optimizes both material costs and researcher efficiency.
You achieve the best value by aligning laboratory equipment specifications with actual experimental demands. Overspecification wastes resources on unnecessary features. Underspecification compromises data quality and increases repeat experiment frequency.
Comparison with Traditional Slides
We compare the structural and functional characteristics of glass bottom chamber slides against conventional microscopy techniques to help you select optimal platforms. Understanding these distinctions enables informed decisions about which approach best serves your specific research applications. The choice between integrated systems and traditional methods impacts specimen quality, workflow efficiency, and experimental outcomes.
Traditional slide preparation separates cell culture from imaging substrate preparation. You typically grow cells in tissue culture flasks or Petri dishes, then transfer specimens to microscope slides through cytospin centrifugation, coverslip mounting, or cell scraping methods. Each transfer step introduces variables that can compromise sample integrity.
Structural Design and Operational Differences
The fundamental distinction between cell culture chambers and conventional methods lies in their integrated versus separated architecture. Traditional protocols require dedicated culture vessels followed by specimen transfer procedures to create microscope-ready samples. This multi-step process demands careful handling at each transition point.
Chambered systems eliminate transfer by combining culture and imaging functions in a single platform. The imaging substrate forms the culture vessel floor, allowing cells to grow directly on the surface you will eventually examine under the microscope. This integration removes an entire workflow phase.
Traditional coverslip methods involve multiple manipulations. You must handle separate glass pieces, sterilize them properly, place them in culture vessels, retrieve them post-fixation, mount them with cells facing the mounting medium, and seal the edges. Each step creates potential for contamination, damage, or inconsistency.
Well separation represents another critical design difference. Multi-well plates with coverslips lack absolute isolation between conditions during washing procedures. Liquid can potentially move between wells, creating cross-contamination risks. Cell culture chambers provide sealed compartments that maintain complete separation until you deliberately remove the chamber structure.
Key Advantages of Chambered Systems
We identify specimen integrity preservation as the primary benefit of glass bottom chamber slides. Eliminating transfer steps prevents cell loss that commonly occurs when harvesting adherent cultures. Monolayer disruption and three-dimensional structure collapse become non-issues when cells never leave their growth substrate.
You preserve critical spatial relationships in co-culture experiments. Cellular processes in extended structures remain intact. Rare or precious samples that cannot tolerate handling stay protected throughout the entire protocol.
Workflow efficiency improves dramatically through reduced protocol steps. Hands-on time decreases significantly. Technical skill requirements for achieving consistent results drop to more accessible levels. These factors enable higher throughput and more reproducible outcomes across different operators.
Protocol standardization becomes achievable because the integrated format removes variables. Coverslip thickness variations disappear. Mounting medium volume inconsistencies no longer affect results. Transfer technique differences between laboratory personnel cease to impact data quality.
Reagent economy represents a substantial practical advantage. Defined well volumes of 200-400 μL consume considerably less expensive antibodies, dyes, and blocking reagents. Compare this to coverslip methods in 35 mm dishes requiring 1-2 mL working volumes. For costly reagents, this difference translates to significant budget savings.
The table below presents a comprehensive microscope slide comparison across critical experimental parameters:
| Feature | Chambered Slides | Traditional Coverslips | Impact on Results |
|---|---|---|---|
| Sample Transfer | Not required | Multiple handling steps | Reduced cell loss and morphological preservation |
| Reagent Volume | 200-400 μL per well | 1-2 mL per culture dish | 75-80% reagent cost reduction |
| Well Isolation | Sealed compartments | Shared liquid environment | Eliminated cross-contamination risk |
| Protocol Steps | Integrated culture-to-imaging | Separate culture, harvest, mount | 40-50% reduction in processing time |
| Operator Variability | Minimal technique dependency | High skill requirement | Improved reproducibility across users |
Application-Specific Selection Criteria
We recommend traditional slide alternatives when specific experimental conditions dictate their use. Imaging system requirements sometimes demand optical configurations incompatible with chambered formats. Very large culture areas that exceed chambered slide capacities necessitate conventional approaches. Absolute minimal cost considerations may justify longer processing time when budget constraints dominate decision-making.
Established protocols that cannot accommodate workflow modifications represent another valid reason for traditional methods. Some laboratories have extensively validated procedures that would require significant revalidation if changed. The investment in maintaining current methods may outweigh potential benefits.
Certain applications specifically require traditional approaches. Histological tissue sections arrive already fixed and must be mounted on standard slides. Cytology specimens from bodily fluids need conventional preparation methods. Samples requiring specialized mounting media incompatible with chambered formats have no alternative.
Conversely, cell culture chambers prove optimal when sample integrity outweighs cost considerations. Parallel processing of multiple conditions provides experimental value that justifies the platform investment. Protocol standardization and reproducibility priorities align perfectly with chambered system capabilities.
Reagent availability limitations make chambered slides particularly attractive. When expensive antibodies or rare fluorescent probes constrain experiment scale, the reduced volumes enable more extensive testing. Workflow efficiency that increases experimental throughput becomes valuable when time represents the limiting factor in research progress.
The microscope slide comparison ultimately depends on balancing these factors against your specific research objectives. We help you evaluate which platform characteristics align with your experimental priorities, resource constraints, and quality requirements. Both approaches remain valuable tools when applied to appropriate applications.
Optimizing Staining Protocols
Research professionals working with lab imaging chambers must implement comprehensive staining optimization techniques to maximize signal clarity and minimize unwanted background interference. We provide systematic protocol refinement strategies that transform standard procedures into high-performance workflows yielding reproducible results. Each phase of the staining process contributes to final image quality, and understanding these interconnections enables you to troubleshoot issues efficiently and achieve consistent outcomes across experimental replicates.
Success in microscopy slides with wells requires balancing multiple technical variables simultaneously. You must consider antibody concentrations, incubation temperatures, buffer compositions, and timing parameters as integrated components rather than isolated factors. This holistic approach to staining optimization ensures that adjustments in one area complement rather than compromise other protocol elements.
Essential Steps for Effective Staining
The foundation of superior staining results begins with proper specimen fixation. You should apply 4% paraformaldehyde for 10-15 minutes at room temperature or use 10% neutral buffered formalin for 10 minutes to preserve cellular structures while maintaining antigen accessibility. Fixation quality directly determines antibody binding efficiency, making this initial step critical for downstream success.
Excessive fixation creates molecular cross-links that mask target epitopes and increase autofluorescence. Insufficient fixation allows antigen diffusion and morphological deterioration. We recommend testing fixation durations across a range to identify optimal conditions for your specific antigens and cell types.
Permeabilization follows fixation to enable antibody penetration through lipid membranes. You should use 0.1-0.5% Triton X-100 in PBS for 5-10 minutes for most intracellular targets in lab imaging chambers. Delicate cellular structures may require gentler detergents such as 0.025% saponin, while membrane proteins might necessitate reduced permeabilization to prevent extraction.
Blocking represents the pivotal phase for staining optimization. You incubate specimens in protein solutions containing 1-10% normal serum from the secondary antibody host species combined with 1-5% BSA for 30-60 minutes. This treatment saturates non-specific antibody binding sites on cellular structures and the slide substrate itself.
Primary antibody incubation requires careful optimization of three parameters:
- Concentration: Conduct titration experiments from 1:50 to 1:1000 dilution to identify optimal signal-to-background ratios
- Duration: Extended overnight incubations at 4°C improve signal for low-abundance antigens compared to 2-hour room temperature treatments
- Buffer composition: Use dilution buffers containing 1% BSA and 0.05% Triton X-100 to maintain antibody stability and accessibility
Secondary antibody selection must match primary antibody species with minimal cross-reactivity. You need to verify that fluorophore excitation and emission spectra are compatible with your microscope filter sets. Spectral overlap between channels compromises multi-color labeling accuracy, requiring careful fluorophore selection or compensation protocols.
| Protocol Step | Reagent Concentration | Duration | Temperature |
|---|---|---|---|
| Fixation | 4% PFA or 10% formalin | 10-15 minutes | Room temperature |
| Permeabilization | 0.1-0.5% Triton X-100 | 5-10 minutes | Room temperature |
| Blocking | 1-10% serum + 1-5% BSA | 30-60 minutes | Room temperature |
| Primary antibody | 1:50 to 1:1000 dilution | 2 hours or overnight | RT or 4°C |
| Secondary antibody | Per manufacturer | 1-2 hours | Room temperature (dark) |
Tips for Minimizing Background Noise
Thorough washing between protocol steps represents the most effective strategy for reducing non-specific signal. We require minimum three washes with 200-300 μL buffer for 5 minutes each to remove unbound antibodies from microscopy slides with wells. Inadequate washing leaves residual antibodies that generate background fluorescence and obscure specific signals.
Buffer composition consistency throughout the protocol prevents antibody aggregation or precipitation. You should ensure that blocking buffer composition matches antibody dilution buffer to maintain stable conditions. Changes in salt concentration, pH, or detergent levels can cause antibodies to aggregate or lose binding affinity.
Photobleaching prevention begins at secondary antibody application. You must work in reduced lighting conditions from this point forward to preserve fluorescence intensity. Light exposure rapidly degrades fluorophores, reducing signal strength and limiting imaging session duration.
Fresh working solution preparation ensures optimal antibody activity. You should prepare antibody dilutions immediately before use rather than storing working solutions. Repeated freeze-thaw cycles and extended storage at inappropriate temperatures compromise antibody functionality and increase background staining.
Mounting media selection with anti-fade compounds preserves fluorescence during imaging sessions. We recommend formulations containing n-propyl gallate, DABCO, or commercial anti-fade reagents that prevent oxidative fluorophore degradation. These specialized mounting media enable specimen storage for weeks or months, allowing later reexamination without signal loss.
The Importance of Controls
Control specimens validate data integrity and enable confident interpretation of experimental results. You cannot determine staining specificity without proper controls, making them essential components of any protocol refinement strategies. Omitting controls introduces uncertainty that undermines scientific conclusions, regardless of how compelling primary experimental images appear.
Negative controls using specimens incubated without primary antibody verify secondary antibody specificity. You incubate these controls with all reagents except primary antibody to demonstrate that observed signals result from primary antibody binding rather than non-specific secondary antibody interactions. Any signal in negative controls indicates protocol optimization requirements.
Positive controls using specimens known to express target antigens confirm antibody functionality. You include these controls to verify that antibodies are active and that protocol conditions enable detection. Absence of signal in positive controls indicates antibody problems, inadequate permeabilization, or inappropriate fixation rather than target absence in experimental specimens.
Isotype controls employ irrelevant antibodies of the same class as primary antibodies. You use these controls to demonstrate that observed staining patterns reflect specific antigen recognition rather than antibody class-specific binding to Fc receptors or other non-target molecules. This control type is particularly important for tissue specimens with high immune cell content.
Single-stain controls are essential for multi-color experiments performed in lab imaging chambers. You prepare separate specimens stained with each fluorophore individually to properly configure microscope settings, identify appropriate exposure times, and characterize spectral bleed-through requiring compensation. These controls enable accurate channel separation and prevent false-positive co-localization conclusions.
Troubleshooting Common Issues
Understanding common complications and their solutions transforms frustrating laboratory setbacks into manageable technical adjustments. We provide systematic guidance for resolving challenges that researchers frequently encounter when working with multi-well microscope slides. This protocol troubleshooting approach enables you to identify problem sources and implement effective solutions quickly.
Technical problem resolution requires methodical analysis of symptoms to determine underlying causes. You can address most issues through adjustments to reagent concentrations, incubation conditions, or substrate preparation. The following sections outline specific solutions for the most prevalent challenges affecting chambered coverglass systems.
Addressing Staining Artifacts
Staining artifacts compromise image quality and can lead to misinterpretation of experimental results. High background fluorescence throughout specimens typically indicates inadequate blocking, insufficient washing between antibody incubations, or excessive antibody concentrations. You can resolve these issues by extending blocking duration to 60 minutes with higher concentrations of blocking reagents.
Increasing blocking reagent concentration up to 10% serum combined with 5% BSA provides superior background reduction. Perform additional wash steps, expanding from three to five washes with extended duration of 10 minutes each. Reducing antibody concentrations through further dilution often eliminates non-specific binding without compromising target signal intensity.
Punctate fluorescent spots scattered across specimens indicate antibody aggregation requiring immediate intervention. Filter antibody solutions through 0.22 μm filters to remove protein aggregates before application. Prepare fresh antibody dilutions rather than using stored working solutions that may have developed precipitates.
Include carrier proteins such as 0.1-1% BSA in dilution buffers to prevent protein precipitation during storage. This simple addition stabilizes antibody molecules and maintains solution homogeneity throughout extended incubation periods.
Edge effects manifest as brighter staining at well perimeters, resulting from evaporation that concentrates reagents near borders. You prevent this by maintaining humidity during incubations through placement of slides in covered containers with wet paper towels. Reducing incubation temperatures decreases evaporation rates significantly.
Sealing wells with adhesive film during extended incubations creates a barrier against moisture loss. Nuclear staining appearing throughout the cytoplasm indicates fixation problems requiring protocol adjustment. Over-fixation with alcohols extracts lipids and compromises membrane integrity, while insufficient fixation allows nuclear protein diffusion.
Cytoplasmic blebbing or cell detachment during staining suggests aggressive permeabilization damaging cellular architecture. Reduce detergent concentration to 0.1% Triton X-100 or shorten permeabilization duration to 2-5 minutes to maintain structural integrity.
Solutions for Poor Sample Adhesion
Cell detachment during protocol washes represents one of the most frustrating technical challenges in multi-well microscope slides applications. Surface coating provides the primary solution for challenging cell types exhibiting weak attachment to standard tissue culture-treated substrates. You can apply various extracellular matrix proteins to enhance cellular adhesion substantially.
Collagen types I, IV, or V at concentrations of 10-50 μg/mL offer excellent adhesion for many cell lines. Fibronectin at 5-10 μg/mL supports attachment of mesenchymal cells and fibroblasts effectively. Laminin at 10-20 μg/mL proves particularly beneficial for epithelial cells and neurons.
Poly-amino acids including poly-D-lysine or poly-L-lysine at 50-100 μg/mL provide charge-based adhesion suitable for numerous cell types. Incubate coating solution in wells for 1 hour at 37°C or overnight at 4°C, followed by thorough rinsing before cell seeding. Coating optimization requires testing multiple proteins and concentrations to identify optimal conditions for specific cell lines.
Increasing cell seeding density creates a more confluent monolayer less susceptible to mechanical disruption during washes. Gentler washing techniques reduce hydrodynamic forces that dislodge cells from substrates. Position pipette tips against well walls rather than directly onto cell layers when adding or removing solutions.
Allow extended attachment periods overnight rather than 3-4 hours before beginning staining protocols. This enables stronger focal adhesion formation that withstands protocol manipulations. Using fixatives that cross-link proteins to substrates, such as glutaraldehyde at 0.1-0.5% combined with paraformaldehyde, can enhance adhesion.
Tips for Managing Sample Evaporation
Sample evaporation during extended incubation periods presents a persistent technical challenge requiring proactive management strategies. Edge wells demonstrate particular vulnerability because they have greater surface area exposed to air compared to central wells. We identify this phenomenon as a primary source of inconsistent results across chambered coverglass experiments.
You can minimize evaporation by filling border wells with sterile PBS or culture medium rather than using them for experimental samples. These perimeter wells function as thermal and humidity buffers protecting interior specimens. Covering slides with supplied lids throughout incubation periods creates a local humidity chamber reducing evaporation rates dramatically.
Place slides on platforms inside larger covered containers such as empty pipette tip boxes lined with wet paper towels. This configuration generates saturated humidity atmospheres preventing liquid loss even during overnight incubations. Reducing incubation temperatures from room temperature to 4°C dramatically decreases evaporation rates.
Overnight incubations at 4°C often provide superior antibody binding results compared to 2-hour room temperature incubations while simultaneously solving evaporation concerns. Work efficiently during protocol steps requiring open wells such as fixation, washing, and reagent exchanges. Process one slide completely before beginning the next rather than performing one step across multiple slides sequentially.
Check wells visually before each step to ensure they have not dried. Immediate rehydration with buffer can sometimes rescue specimens if desiccation is caught quickly. Proper environmental controls in laboratory spaces including temperature stability and moderate humidity levels of 40-60% relative humidity create conditions favoring successful protocols.
| Problem Type | Primary Cause | Recommended Solution | Optimization Parameter |
|---|---|---|---|
| High background fluorescence | Inadequate blocking or excessive antibody concentration | Extend blocking to 60 minutes with 10% serum plus 5% BSA | Increase wash steps to five cycles of 10 minutes each |
| Punctate fluorescent spots | Antibody aggregation in solution | Filter antibody solutions through 0.22 μm filters | Add 0.1-1% BSA as carrier protein to dilution buffer |
| Poor cell adhesion | Insufficient substrate coating or weak focal adhesions | Apply collagen IV at 10-50 μg/mL or fibronectin at 5-10 μg/mL | Extend attachment period to overnight before staining |
| Sample evaporation | Extended incubation with inadequate humidity control | Use edge wells as PBS-filled humidity buffers | Reduce temperature to 4°C for overnight incubations |
| Edge effect artifacts | Differential evaporation concentrating reagents at perimeters | Place slides in covered containers with wet paper towels | Seal wells with adhesive film during extended steps |
Systematic protocol troubleshooting transforms technical challenges into opportunities for experimental optimization. By understanding the mechanisms underlying common problems with multi-well microscope slides, you can implement targeted solutions that improve data quality. These evidence-based strategies enable consistent, reproducible results across diverse cell staining applications.
Innovations in 8-Well Chambered Slide Technology
We observe continuous transformation in chambered slide technology as manufacturers develop solutions addressing increasingly sophisticated experimental requirements. Laboratory innovation drives improvements across multiple dimensions, from substrate materials to design features that enhance workflow efficiency. These advancements in tissue culture chamber slides expand research capabilities while simplifying complex protocols.
The evolution of cell imaging wells reflects collaboration between materials scientists, optical engineers, and research professionals. Each innovation addresses specific challenges encountered in modern cellular research. We examine these developments to help you understand how emerging technologies enhance experimental outcomes.
Material Science Breakthroughs
Substrate composition has evolved significantly beyond traditional glass formulations. Manufacturers now produce specialized glass with precisely controlled refractive indices that match immersion media including oil, glycerol, and water. This optimization minimizes spherical aberration during high-resolution imaging.
Advanced microscopy techniques demand strict optical specifications. You can now access substrates with thickness tolerances of 170 ± 5 micrometers, meeting requirements for super-resolution methods like STORM, PALM, and structured illumination microscopy. These specifications ensure that deviations from design parameters do not degrade image quality.
Surface chemistry innovations represent another frontier in emerging technologies. Novel coatings include:
- Chemically modified CC2 surfaces that mimic poly-D-lysine for challenging cell types requiring enhanced adhesion
- Biomimetic coatings replicating specific extracellular matrix compositions for physiologically relevant culture environments
- Synthetic hydrogel layers with tunable mechanical properties enabling mechanotransduction studies
- Antifouling treatments that resist non-specific protein adsorption, reducing background in binding assays
Patterned surface treatments create defined adhesive regions separated by non-adhesive barriers. This innovation enables controlled cell positioning for precise co-culture geometries and single-cell analysis applications. Polymer materials combining optical clarity approaching glass with enhanced flexibility offer alternatives where traditional substrates present handling challenges.
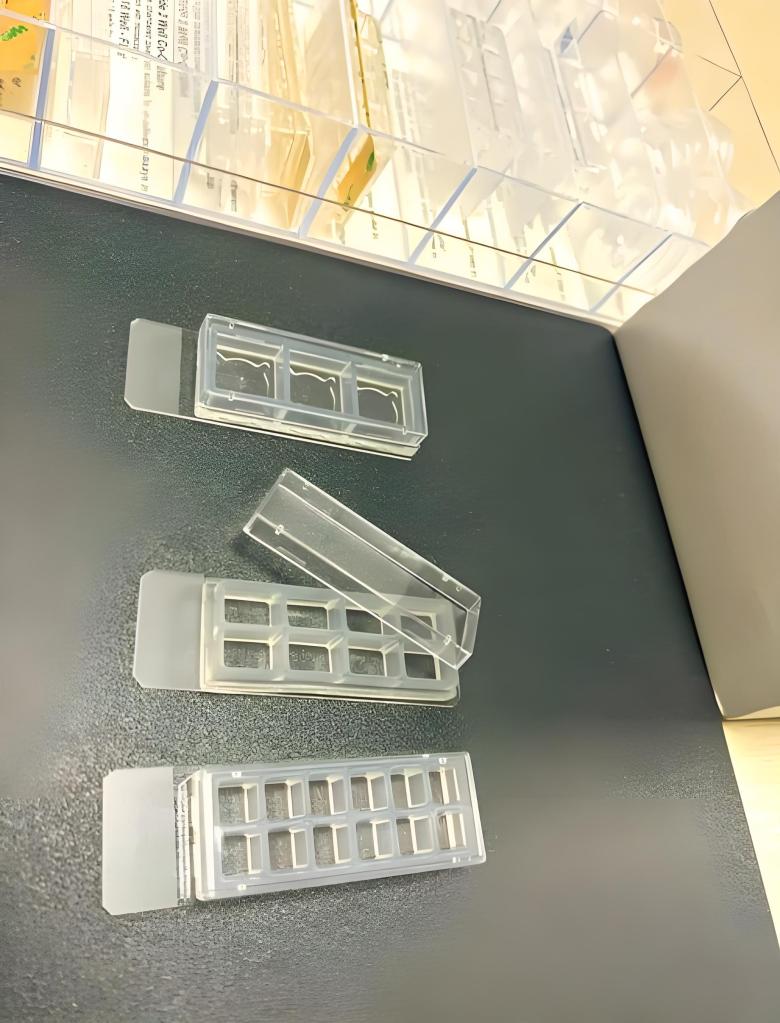
8-Well Chambered Slides for Cell Immunofluorescence in Laboratory Setting
Optical clearing protocols using glycerol-based solutions enhance imaging capabilities. Formulations containing 90 percent glycerol with n-propyl gallate anti-fade agents enable confocal imaging of three-dimensional structures including tumor spheroids. These protocols expand the application range for cell imaging wells beyond traditional monolayer cultures.
Enhanced Design Engineering
Chamber attachment systems have undergone substantial redesign addressing practical workflow challenges. We see development of sealing mechanisms that provide stronger leak prevention during vigorous washing while maintaining easy removal without tools. This laboratory innovation prevents specimen damage during chamber detachment.
Integrated gasket designs create more consistent well volumes, improving reproducibility between wells and experimental replicates. Chamber geometries with optimized corner radii prevent bubble trapping during liquid dispensing. Complete reagent exchange during washing steps becomes more reliable with these improvements.
Writing surfaces now feature enhanced contrast and chemical resistance. Clear sample labeling withstands alcohol exposure and handling throughout protocols. Some systems incorporate barcode or RFID identification enabling automated sample tracking in high-throughput laboratories.
Compatibility enhancements include standardized footprints matching automated liquid handling systems, microscope stage holders, and incubator formats. These design features facilitate integration into existing laboratory infrastructure without requiring equipment modifications.
Chamber height options provide greater application-specific flexibility. Shallow chambers minimize reagent volumes for expensive compounds. Deep chambers accommodate three-dimensional cultures including spheroids and organoids, expanding experimental possibilities.
The Path Forward for Research Tools
Future trends in laboratory equipment point toward increasing integration, automation, and miniaturization. We anticipate development of tissue culture chamber slides with embedded sensors monitoring pH, oxygen concentration, or temperature in real-time during live cell imaging. These capabilities provide environmental context for observed cellular behaviors.
Integration with microfluidic technologies will enable perfusion culture systems in chambered formats. Dynamic control over chemical gradients, shear stress application, or drug exposure profiles becomes possible while maintaining high-resolution imaging compatibility. This convergence represents a significant advancement in experimental design possibilities.
Automated systems combining robotic liquid handling with integrated microscopy will reduce hands-on time requirements. Experiments spanning extended timescales with frequent imaging timepoints become practical through automation. Manual execution limitations no longer restrict experimental scope.
Miniaturization efforts will produce higher-density formats including 32, 64, or 96-well chambered slides. These emerging technologies enable more extensive condition testing with reduced sample and reagent requirements. This proves particularly valuable for primary cells, patient-derived specimens, or expensive compounds.
Sustainability considerations drive development of reusable chambered systems with replaceable membrane inserts. Reducing plastic waste while maintaining experimental quality addresses environmental concerns. Enhanced compatibility with emerging imaging modalities including light-sheet microscopy and adaptive optics approaches will expand three-dimensional imaging capabilities.
Machine learning integration will enable real-time image analysis during acquisition. Adaptive imaging strategies that identify and prioritize regions of interest automatically optimize data collection efficiency. This innovation proves especially valuable for heterogeneous samples requiring selective analysis.
Conclusion: Best Practices for 8-Well Chambered Slides
Successful implementation of 8-Well Chambered Slides requires attention to systematic planning and technical execution. We recommend starting with thorough experimental design that identifies specific objectives and selects appropriate slide specifications before beginning protocols. This approach prevents resource waste and accelerates achieving reliable results.
Implementation Strategies
Your laboratory best practices should include conducting small-scale optimization experiments using a subset of wells. Test critical parameters such as cell seeding density, coating conditions, and antibody concentrations before committing entire slides to experimental conditions. This strategy reduces costs and improves protocol efficiency.
Maintain consistent technique throughout all procedures. Gentle pipetting during washes, precise timing across wells, and protection from light after fluorophore introduction ensure reproducible outcomes. Document protocol details comprehensively, including lot numbers, exact incubation times, and any deviations from standard procedures.
Maximizing Research Outcomes
Implement proper controls in every experiment. Negative controls without primary antibodies, positive controls with known antigen expression, and single-stain controls for multi-color experiments validate data interpretation. These cell culture chambers represent powerful tools for advancing research when selected appropriately and used with proper technique.
Stay informed about emerging innovations through scientific literature and manufacturer technical resources. Your investment in understanding research optimization strategies will yield substantial returns through improved data quality and expanded experimental possibilities.
References and further readings:
1.Schnell U, Dijk F, Sjollema KA, Giepmans BNG. Immunolabeling artifacts and the need for live-cell imaging. Nat Methods. 2012;9(2):152–158.
https://www.nature.com/articles/nmeth.18552.Barrera LA, Carballo GB, et al. Immunofluorescence microscopy in cultured cells: Optimization and troubleshooting. J Vis Exp. 2020;(162):e61653.
https://www.jove.com/t/61653/versatile-dual-inlet-sample-introduction-system-for-multi-mode-single3.Craft M, Kedei N, Wedin N, Feld GK, et al. Development and testing of specimen-protecting microscopy consumables that enable the automation of cyclic immunofluorescence methodology. Cancer Res. 2025;85(8_Suppl_1):2098. Available from:
https://aacrjournals.org/cancerres/article/85/8_Supplement_1/2098/7549094.Yang Z, Wang W, Sun X, et al. Comparative evaluation of chamber slide materials for optimal fluorescent staining and imaging of cultured cells. Microsc Res Tech. 2022;85(11):3472–3481.
https://analyticalsciencejournals.onlinelibrary.wiley.com/doi/10.1002/jemt.24103
FAQ
What are 8-Well Chambered Slides and how do they differ from regular microscope slides?
8-Well Chambered Slides are specialized laboratory equipment that integrate cell culture and imaging capabilities in a single platform. They consist of a standard microscope slide base with a removable multi-well chamber structure that creates eight individual culture compartments. Unlike regular microscope slides that require separate cell culture vessels and transfer procedures, these cell culture chambers allow you to perform complete experimental protocols—from cell seeding through fixation, staining, and microscopic imaging—without moving samples between containers. The removable chamber design maintains sterile culture conditions during incubation, then transforms into a standard microscope slide format after chamber removal, eliminating transfer steps that can compromise sample integrity.
What are the main advantages of using glass bottom chamber slides for immunofluorescence?
Glass bottom chamber slides provide superior optical properties essential for high-resolution fluorescence microscopy applications. The primary advantages include minimal autofluorescence background that would compromise signal detection in plastic vessels, precise refractive indices matching immersion media for optimal image quality, and compatibility with high-numerical-aperture objectives. You also benefit from enhanced staining precision through controlled well geometry ensuring consistent antibody distribution, reduced contamination risks via sealed compartments preventing cross-contamination between adjacent wells, and significant reagent economy with typical working volumes of 200-400 μL per well compared to 1-2 mL required for traditional coverslip methods in culture dishes.
How do I choose between glass and plastic substrates for my microscopy slides with wells?
Your substrate selection depends on specific experimental requirements balancing optical performance, cell compatibility, and cost considerations. We recommend glass substrates when you require publication-grade imaging quality, high-resolution fluorescence microscopy, minimal autofluorescence background, or compatibility with oil immersion objectives requiring specific refractive indices. Glass provides superior optical clarity essential for quantitative analysis and advanced imaging modalities including confocal and super-resolution microscopy. However, plastic substrates may be appropriate when certain cell types demonstrate enhanced adhesion to polystyrene, when cost constraints are significant for screening applications or protocol optimization experiments, or when optical requirements are less stringent. You should evaluate total cost per data point including reagent volumes, labor time, and success rate rather than solely chamber unit price.
What cell types work best with tissue culture chamber slides?
Tissue culture chamber slides accommodate diverse adherent cell lines including fibroblasts, epithelial cells, endothelial cells, and various primary cultures. Standard tissue culture-treated surfaces support most common adherent cell lines that attach readily to charged substrates. However, challenging cell types including primary neurons, stem cells, weakly adherent lines, or suspension-adapted cells may require specialized surface coatings. You can apply extracellular matrix proteins including poly-D-lysine, poly-L-lysine (50-100 μg/mL), collagen types I or IV (10-50 μg/mL), fibronectin (5-10 μg/mL), or laminin (10-20 μg/mL) to promote cell adhesion. We recommend conducting small-scale tests with your specific cell line to optimize coating conditions, seeding density, and attachment duration before committing to full experimental protocols.
How much reagent volume do I need per well in lab imaging chambers?
Standard 8-well formats typically accommodate 200-400 μL working volume per well, sufficient for most immunofluorescence and staining protocols while minimizing expensive reagent consumption. You should ensure complete coverage of the cell monolayer—we recommend using volumes toward the higher end of the range (300-400 μL) for antibody incubations to prevent edge effects from evaporation and ensure uniform reagent distribution. During washing steps, you can use 200-300 μL per wash cycle, performing minimum three washes of 5 minutes each to remove unbound antibodies effectively. The defined well volumes represent significant reagent economy compared to traditional methods requiring 1-2 mL for coverslips in 35 mm dishes, particularly valuable when working with expensive primary antibodies or limited reagent supplies.
Can I use multi-well microscope slides for live cell imaging experiments?
Yes, multi-well microscope slides are well-suited for live cell imaging applications when proper environmental control is maintained. The transparent chamber structure and high-quality optical substrates enable time-lapse microscopy tracking cell division, migration, or responses to stimuli. You can achieve successful live imaging by maintaining physiological conditions through compatibility with stage-top incubators providing temperature control (typically 37°C), CO₂ regulation (5% for bicarbonate-buffered media), and humidity to prevent evaporation. The chambered format is compatible with perfusion systems enabling extended imaging sessions spanning hours or days with continuous media flow. We recommend using chambers with optimized height for your application—standard heights suit short-term experiments while deeper chambers accommodate extended culture periods with larger media volumes providing better buffering capacity and nutrient availability.
What surface coatings should I use if my cells are not adhering well to chambered coverglass?
When experiencing poor cell adhesion to chambered coverglass, we recommend systematic testing of extracellular matrix protein coatings optimized for your specific cell type. For most cell lines with weak attachment, poly-D-lysine or poly-L-lysine at 50-100 μg/mL provides effective positive charge-based adhesion enhancement. Apply coating solution to wells for 1 hour at 37°C or overnight at 4°C, then rinse thoroughly before cell seeding. For cells requiring more physiological substrates, collagen type I (10-50 μg/mL) suits fibroblasts and many epithelial cells, fibronectin (5-10 μg/mL) works well for endothelial cells and mesenchymal lines, and laminin (10-20 μg/mL) benefits neural cells and certain epithelial populations. You can also try combination coatings or specialized formulations for stem cells. Allow extended attachment periods (overnight rather than 3-4 hours) and increase seeding density to promote monolayer formation before beginning staining protocols.
How do I prevent evaporation during long antibody incubations in cell imaging wells?
Preventing evaporation during extended incubations requires implementing multiple humidity control strategies. We recommend placing slides in covered containers (empty pipette tip boxes or specialized humidity chambers) with wet paper towels lining the bottom to create saturated humidity atmospheres. Fill border wells with sterile PBS or culture medium rather than using them for experimental samples—these serve as humidity buffers protecting central experimental wells. Cover slides with supplied lids throughout all incubation periods to create local humidity chambers. For overnight incubations, conduct them at 4°C rather than room temperature, which dramatically reduces evaporation rates while often improving antibody binding for low-abundance antigens. You can also seal wells with adhesive film during extended incubations, though you must ensure the seal does not introduce contamination or interfere with gas exchange if cells remain viable.
What controls should I include when performing immunofluorescence with 8-Well Chambered Slides?
Proper controls are essential for validating your immunofluorescence data. We require including negative controls where you incubate specimens without primary antibody (proceeding directly to secondary antibody) to verify that observed signal results from specific primary antibody binding rather than non-specific secondary antibody interactions with cellular structures or the substrate. Include positive controls using specimens known to express your target antigen, confirming that antibodies are functional and protocol conditions enable detection. For additional specificity validation, use isotype controls—irrelevant antibodies of the same class and concentration as your primary antibody—demonstrating that staining patterns reflect antigen recognition rather than antibody class-specific binding. When performing multi-color experiments, prepare single-stain controls (specimens labeled with only one fluorophore at a time) to properly configure microscope settings, identify appropriate exposure times for each channel, and characterize spectral bleed-through requiring compensation during image acquisition.
Can I reuse 8-Well Chambered Slides after removing the chamber?
No, 8-Well Chambered Slides are designed as single-use laboratory consumables. Once you remove the chamber structure following fixation and staining protocols, the slide becomes a permanent microscope specimen. The chamber removal process is destructive to the seal, and the adhesive or silicone attachment mechanism cannot be reliably re-established. However, the resulting slide can be stored long-term as a permanent specimen if you apply appropriate mounting medium with anti-fade compounds and seal with a coverslip. For fluorescence specimens, store slides in dark conditions at 4°C or -20°C to minimize photobleaching and preserve signal intensity for future re-examination. Some mounting media formulations provide fluorescence preservation for months to years when properly stored, enabling you to revisit specimens for additional imaging or verification of findings.
What is the optimal cell seeding density for 8-Well Chambered Slides?
Optimal cell seeding density depends on your experimental timeline and analysis requirements. For most immunofluorescence applications where you fix cells 24-48 hours after seeding, we recommend starting with 20,000-40,000 cells per well (0.7-1.0 cm² growth area), achieving 60-80% confluence at the time of fixation. This density provides sufficient cells for robust signal detection while maintaining individual cell resolution for morphological analysis and preventing overcrowding that obscures cellular details. For experiments requiring confluent monolayers (barrier function studies, epithelial morphology assessment), seed at higher densities (40,000-60,000 cells per well) or extend culture duration. For single-cell analysis, migration studies, or experiments where cell-cell contact must be minimized, use lower seeding densities (5,000-15,000 cells per well). You should optimize seeding density for your specific cell line by conducting preliminary experiments testing a range of concentrations and evaluating confluence at your intended fixation timepoint.
How do I properly wash cells in lab imaging chambers without causing detachment?
Proper washing technique is critical for maintaining sample integrity throughout staining protocols. We recommend using gentle pipetting with tips positioned against well walls rather than dispensing liquid directly onto the cell monolayer, which creates hydrodynamic forces that can dislodge cells. Tilt the slide slightly so liquid flows across the surface gradually rather than impacting cells directly. Add wash buffer slowly (over 3-5 seconds) allowing gentle mixing with residual reagent. During aspiration, position pipette tips at well corners or edges, removing liquid carefully without allowing wells to dry completely—leaving approximately 50 μL residual volume prevents desiccation that damages cells. Perform minimum three wash cycles of 5 minutes each for thorough reagent removal. For particularly weakly adherent cells, consider increasing wash volumes while maintaining gentle technique, or reduce the number of washes if antibody background remains acceptable, prioritizing sample retention over perfect background reduction.
What are the typical dimensions and specifications of 8-Well Chambered Slides?
Standard 8-Well Chambered Slides conform to microscope slide dimensions of 75 mm × 25 mm (3 inches × 1 inch), ensuring compatibility with conventional slide holders, storage systems, and microscope stages. Each well typically provides 0.7-1.0 cm² growth area with working volumes of 200-400 μL depending on chamber height. The glass substrate thickness is precisely controlled at 170 ± 5 μm (Number 1.5 coverslip thickness) to meet the design specifications of high-numerical-aperture objectives and ensure optimal optical performance. Chamber materials consist of medical-grade polystyrene or polycarbonate providing transparency for visual monitoring, chemical resistance to common laboratory reagents, and biocompatibility for cell culture applications. The well arrangement creates a 2×4 format with center-to-center spacing compatible with multichannel pipettes for efficient liquid handling. Total chamber height varies by manufacturer but typically ranges from 8-12 mm for standard formats, with “high-wall” variants reaching 15-20 mm to accommodate larger working volumes for extended culture applications.
How should I store unused chambered coverglass to maintain sterility?
Proper storage of unused chambered coverglass maintains sterility and preserves surface properties until use. We recommend keeping slides in their original sterile packaging until immediately before use, storing packages in a clean, dry environment at room temperature (15-25°C) away from direct sunlight, temperature extremes, and high humidity that could compromise packaging integrity. Avoid storage in areas with significant temperature fluctuations that might cause condensation inside sterile packages. Once you open a package, use all slides promptly or transfer unused slides to a sterile container with a secure lid, handling only the edges to avoid contaminating culture surfaces. Do not autoclave pre-treated chambered slides as high heat and steam can damage surface coatings and chamber seals. If surface treatments have been applied (ECM protein coatings), follow manufacturer specifications for storage duration and conditions, as many protein coatings have limited stability requiring use within days to weeks of preparation.
What microscopy techniques are compatible with tissue culture chamber slides?
Tissue culture chamber slides support diverse microscopy modalities depending on substrate specifications. Standard applications include brightfield microscopy for morphological assessment and phase contrast imaging for live cell observation. Fluorescence microscopy represents the primary use case, with compatibility spanning widefield epifluorescence, confocal laser scanning microscopy, spinning disk confocal systems, and deconvolution microscopy for optical sectioning. Glass substrates with precise thickness specifications (170 ± 5 μm) enable high-resolution imaging with oil immersion objectives (60×, 63×, 100×) required for detailed subcellular structure visualization. Advanced techniques including super-resolution microscopy (STORM, PALM, STED, structured illumination) require specialized glass formulations with controlled refractive indices and minimal autofluorescence. Total internal reflection fluorescence (TIRF) microscopy benefits from the glass-water interface for visualization of membrane-proximal events. For three-dimensional specimens like organoids, you can perform confocal z-stack acquisition followed by optical clearing protocols, enabling volume imaging. The standard slide format ensures compatibility with most inverted and upright microscope configurations.
How do I optimize fixation conditions for different antigens in multi-well microscope slides?
Optimizing fixation requires balancing structural preservation with antigen accessibility, which varies by target protein characteristics. For most cytoplasmic and membrane proteins, we recommend 4% paraformaldehyde (PFA) in PBS for 10-15 minutes at room temperature, providing cross-linking that preserves morphology while maintaining epitope accessibility. For nuclear antigens and transcription factors, 10% neutral buffered formalin for 10 minutes often yields superior results. Some antigens require methanol fixation (-20°C methanol for 5-10 minutes) which simultaneously fixes and permeabilizes, though this can compromise morphology for certain cell types. Acetone fixation (5 minutes at -20°C) suits specific membrane proteins. For challenging antigens masked by standard fixation, try reduced fixative concentration (2% PFA), shorter duration (5 minutes), or antigen retrieval techniques after fixation (heat-induced retrieval in citrate buffer). You should consult antibody manufacturer datasheets for recommended fixation protocols specific to each antibody, as optimal conditions vary significantly between antigens based on protein structure, localization, and epitope characteristics.
Can I perform co-culture experiments in cell culture chambers?
Yes, cell culture chambers provide excellent platforms for co-culture experiments where you need to visualize spatial relationships between different cell types. You can seed multiple cell types simultaneously in defined ratios, allowing them to interact and self-organize during culture. Alternatively, perform sequential seeding where you culture one cell type until adherent, then introduce the second population. The multi-well format enables parallel assessment of different cell ratio combinations (1:1, 1:2, 1:5, 1:10) across wells, facilitating systematic optimization of co-culture conditions. For applications requiring physical separation with paracrine signaling, some researchers use cell-type-specific labeling (fluorescent cell trackers, immunofluorescence with cell-type-specific markers) to distinguish populations in mixed cultures. The defined well geometry prevents cell mixing between experimental conditions while enabling internal controls. Following culture and experimental treatments, you can perform multi-marker immunofluorescence to identify each cell type (using lineage-specific markers) while simultaneously assessing target proteins, enabling cell-type-specific analysis of responses within the co-culture microenvironment.
What are the best practices for removing chambers from glass bottom chamber slides?
Proper chamber removal technique preserves specimen integrity while creating clean slides for imaging. We recommend performing removal after completing all staining steps including final washes, ensuring cells are fully processed and stabilized through fixation. Work in a clean area to prevent contamination during the exposure of the specimen surface. For systems with adhesive seals, carefully peel the chamber assembly away from the glass substrate starting from one corner, applying steady horizontal force parallel to the slide surface rather than pulling upward which might lift the glass. Some manufacturers provide specialized removal tools or recommend grasping specific regions of the chamber for optimal leverage. Immediately after removal, examine wells for residual adhesive or chamber material that might interfere with imaging—you can carefully remove debris with forceps if necessary. Apply mounting medium promptly after chamber removal to prevent specimen desiccation. For systems with silicone seals, the removal process is generally easier with less adhesive residue, but you must still work carefully to avoid touching the specimen surface, which would introduce fingerprints and artifacts affecting image quality.
How do temperature conditions affect cell culture and staining in lab imaging chambers?
Temperature significantly impacts both cell culture conditions and staining protocol efficiency in lab imaging chambers. During the culture phase before fixation, maintaining 37°C (mammalian cells) or species-appropriate temperature ensures normal cellular metabolism, proliferation, and experimental response to treatments. The relatively small media volumes in chambered formats (200-400 μL) make them more susceptible to temperature fluctuations than larger culture vessels, requiring careful environmental control through incubator use. Following fixation, temperature affects staining kinetics—room temperature (20-25°C) incubations for 1-2 hours provide adequate antibody binding for abundant antigens, while 4°C overnight incubations enhance signal for low-abundance targets by extending binding time while reducing degradation. Lower temperatures also dramatically reduce evaporation during extended incubations, an important consideration for the limited volumes in chambered formats. However, cold temperatures slow antibody diffusion and binding kinetics, requiring longer incubation periods to achieve equivalent signal compared to room temperature. For particularly temperature-sensitive antigens or fluorophores prone to degradation, conducting all post-fixation steps at 4°C with appropriate timing extensions preserves specimen quality through completion of imaging protocols.
Leo Bios
Hello, I’m Leo Bios. As an assistant lecturer, I teach cellular and
molecular biology to undergraduates at a regional US Midwest university. I started as a research tech in
a biotech startup over a decade ago, working on molecular diagnostic tools. This practical experience
fuels my teaching and writing, keeping me engaged in biology’s evolution.




Leave a Comment
Your email address will not be published. Required fields are marked *